Implementing Multiple Comment Sections in a Static Website Generated by Hugo

Foreword
🔗If you have the habit of running a personal website, you probably want to engage with your visitors. There are many third-party tools available on the internet that enable quick and easy integration of comment sections, such as Disqus, Gitalk, Utterances, Commento, FB, and so on.
However, based on my own reading habits and experiences, sometimes I refrain from leaving comments on articles that use Facebook Comments Plugin because I don't want to reveal too much personal information. Or, if a non-technical person wants to ask a question, but the website only provides commenting functionality that requires a Github account, like Utterances or Gitalk, or requires additional account registration, like Disqus, the desire to leave a comment is quickly diminished.
Therefore, I decided to implement all the comment sections that I could think of on my website. That way, if still no one leaves a comment, I can only blame the quality of my writing!😂
Idea
🔗My approach is to provide multiple comment sections, but initially hide them using CSS. Above the comment sections, a menu is provided for users to select their preferred commenting method. When a user clicks on a specific comment section button, the CSS is modified to display that comment section, while the others are set to hidden.
Code
🔗In the HTML section, a button is added for each comment section that will be used. For this example, Facebook, Github, and Disqus will be utilized, resulting in three buttons. To avoid modifying the original theme of Hugo, the single.html file in the root directory\layouts\_default can be modified. If this file does not exist, it can be copied from
root directory\themes\theme\layouts\_default\single.html.
The HTML code should be added below {{ partial "comments.html" . }} in the single.html file.
HTML<nav class="nav">
	<button id="fb-btn" class="nav-item is-active" active-color="#ACD6FF">Facebook</button>
	<button id="github-btn" class="nav-item" active-color="#ACD6FF">Github</button>
	<button id="disqus-btn" class="nav-item" active-color="#ACD6FF">Disqus</button>
	<span class="nav-indicator"></span>
</nav>
Add an ID for each button in the HTML, so that JavaScript can use it to determine which comment section should be displayed.
The following CSS and JS are some materials found online, which are used to decorate the buttons and add dynamic click effects. The appearance can be modified according to personal preferences.
CSS.nav {
		display: inline-flex;
		position: relative;
		overflow: hidden;
		max-width: 100%;
		background-color: #fff;
		padding: 0 20px;
		border-radius: 40px;
		box-shadow: 0 10px 40px rgba(255, 255, 255, 0.8);
		display: flex;
		justify-content: center;

	}

	.nav-item {
		color: #83818c;
		padding: 20px;
		text-decoration: none;
		transition: .3s;
		margin: 0 6px;
		z-index: 1;
		font-family: 'DM Sans', sans-serif;
		font-weight: 500;
		position: relative;

		&:before {
			content: "";
			position: absolute;
			bottom: -6px;
			left: 0;
			width: 100%;
			height: 5px;
			background-color: #dfe2ea;
			border-radius: 8px 8px 0 0;
			opacity: 0;
			transition: .3s;
		}
	}

	.nav-item:not(.is-active):hover:before {
		opacity: 1;
		bottom: 0;
	}


	.nav-item:not(.is-active):hover {
		color: #333;
	}

	.nav-indicator {
		position: absolute;
		left: 0;
		bottom: 0;
		height: 4px;
		transition: .5s;
		height: 5px;
		z-index: 1;
		border-radius: 8px 8px 0 0;
	}

	.nav-item {
		border: none;
		outline: none;
		background-color: #fff;
	}

	@media (max-width: 580px) {
		.nav {
			overflow: auto;
		}
	}
JavaScriptconst indicator = document.querySelector('.nav-indicator');
	const items = document.querySelectorAll('.nav-item');

	function handleIndicator(el) {
		items.forEach(item => {
			item.classList.remove('is-active');
			item.removeAttribute('style');
		});

		indicator.style.width = `${el.offsetWidth}px`;
		indicator.style.left = `${el.offsetLeft}px`;
		indicator.style.backgroundColor = el.getAttribute('active-color');

		el.classList.add('is-active');
		el.style.color = el.getAttribute('active-color');
	}


	items.forEach((item, index) => {
		item.addEventListener('click', (e) => { handleIndicator(e.target) });
		item.classList.contains('is-active') && handleIndicator(item);
	});
At this point, you will see a menu with no functionality yet.

Below the menu is the section to display the comment section. Since I prefer the default is the Facebook comment function, added style="display: block;" to the Facebook section, added style="display: none;"to the other comment sections.
(Note that this article does not provide a tutorial for how to add various comment sections.)
HTML
<div id="disqus-comments" class="comments markdown" style="display: none;">
	{{ partial "disqus.html" . }}
</div>

<div id="utterances-comments" class="comments markdown" style="display: none;">
	<script src="https://utteranc.es/client.js" repo="your repo" issue-term="pathname"
		theme="github-light" crossorigin="anonymous" async>
		</script>
</div>

<div id="facebook-comments" class="fb-comments" data-href="your url" data-width="100%" data-numposts="5" style="display: block;"></div>
Next, use JavaScript to modify the CSS when a button is clicked, achieving the effect of hiding or displaying the comment sections.
JavaScript  // get button element
	const githubBtn = document.getElementById("github-btn");
	const disqusBtn = document.getElementById("disqus-btn");
	const fbBtn = document.getElementById("fb-btn");

	// get message board element
	const githubBoard = document.getElementById("utterances-comments");
	const disqusBoard = document.getElementById("disqus-comments");
	const fbBoard = document.getElementById("facebook-comments");
	// Add click event listeners to each button
	githubBtn.addEventListener("click", function () {
		githubBoard.style.display = "block";
		disqusBoard.style.display = "none";
		fbBoard.style.display = "none";
	});
	disqusBtn.addEventListener("click", function () {
		githubBoard.style.display = "none";
		disqusBoard.style.display = "block";
		fbBoard.style.display = "none";
	});
	fbBtn.addEventListener("click", function () {
		githubBoard.style.display = "none";
		disqusBoard.style.display = "none";
		fbBoard.style.display = "block";
	});
Use the document.getElementById method to select each button element and then add a click event listener to it. When the button is clicked, modify the CSS to show or hide the corresponding comment section.
Conclusion
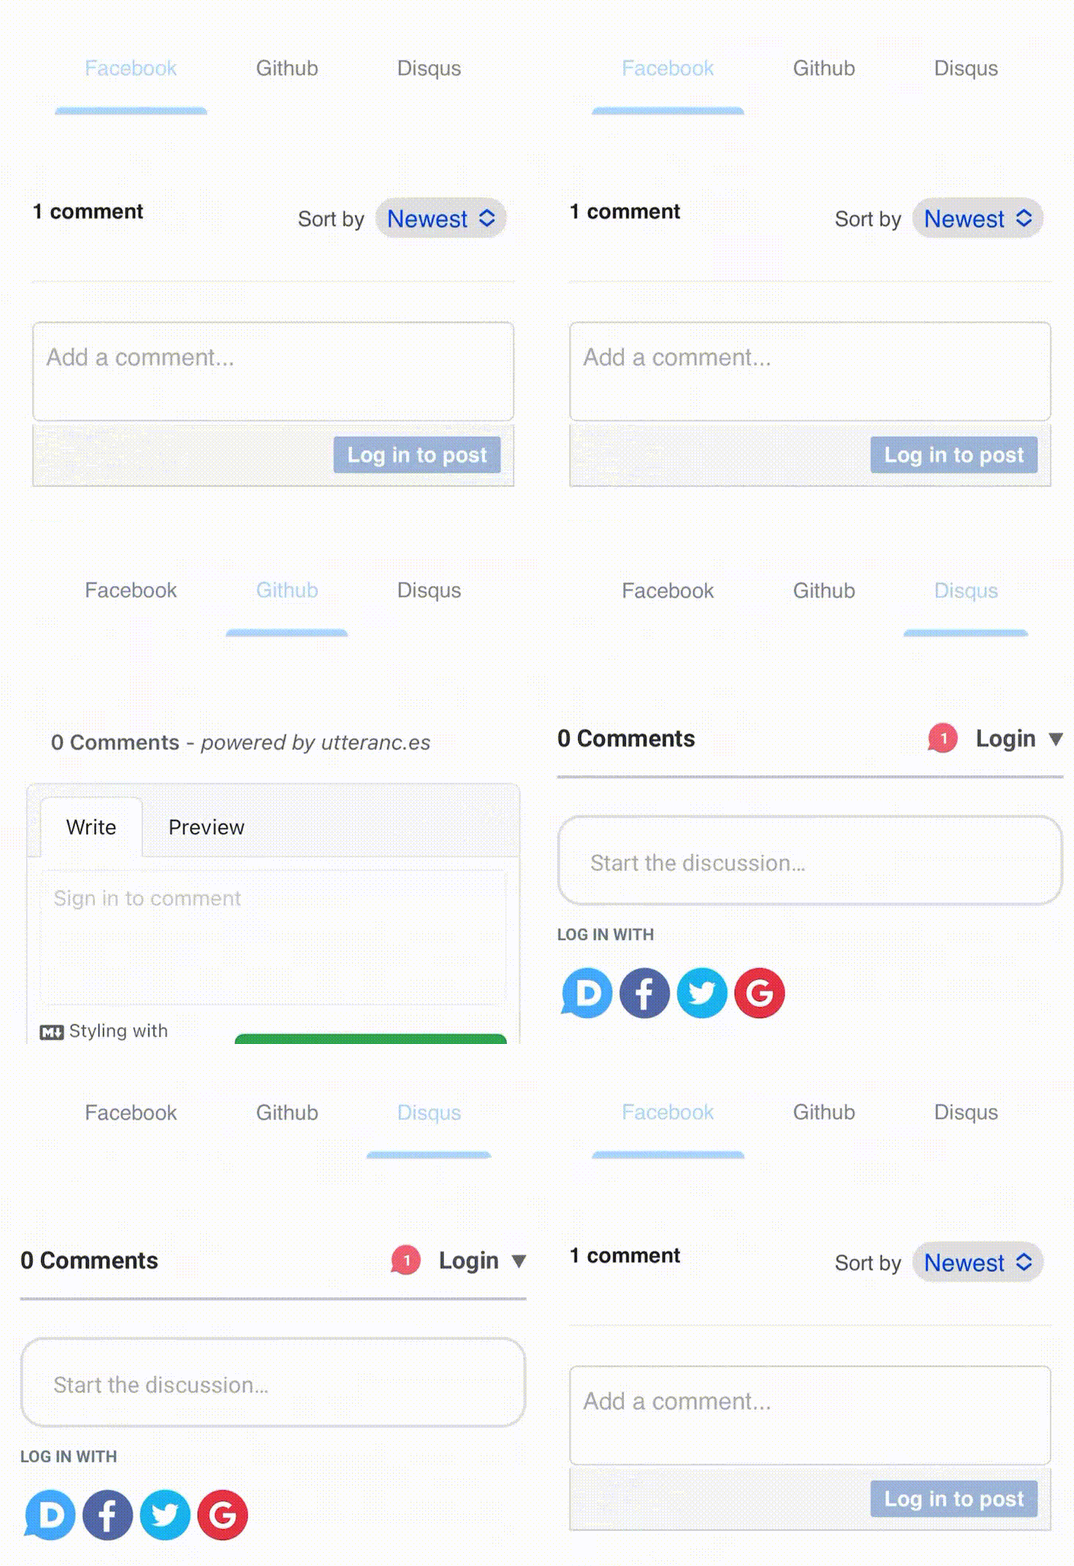
🔗Finished Product!!

Part of the reason I had this idea was also because I have a hard time choosing between different third-party comment plugins, so I decided to use all of them. 😎
Alvin
Software engineer who dislikes pointless busyness, enjoys solving problems with logic, and strives to find balance between the blind pursuit of achievements and a relaxed lifestyle.


