Implementing Multilingual Support in ASP.NET Core Blazor

Foreword
🔗Because during my side projects, I often like to mix both Chinese and English for displaying website information. However, my partner criticized that not everyone understands English. Therefore, I thought about implementing multilingual support, allowing users to choose freely. Hence, I'm documenting the process of implementation
Principle
🔗To implement multilingual functionality on a website, the primary task is to predefine the corresponding translation data. This data can be obtained via JavaScript based on the user's preferred language, and then displayed on the screen accordingly. Fortunately, Blazor has already provided this feature, and it can be implemented in just a few steps.
Environment
🔗- Blazor Webassembly
- .Net 6
Step 1-Registration Service
🔗Install the corresponding version of the package
Microsoft.Extensions.Localization
Register the service in Program.cs
Add:
C#builder.Services.AddLocalization();
and
C#var host = builder.Build();
CultureInfo culture;
var js = host.Services.GetRequiredService<IJSRuntime>();
var result = await js.InvokeAsync<string>("blazorCulture.get");
if (result != null)
{
    culture = new CultureInfo(result);
}
else
{
    culture = new CultureInfo("zh-TW");
    await js.InvokeVoidAsync("blazorCulture.set", "zh-TW");
}
CultureInfo.DefaultThreadCurrentCulture = culture;
CultureInfo.DefaultThreadCurrentUICulture = culture;
Mainly through JS to obtain the local storage language parameters, if not, the default is Traditional Chinese.
And rewrite
await builder.Build().RunAsync(); as await host.RunAsync();
The complete code is:
C#builder.Services.AddLocalization();

var host = builder.Build();
CultureInfo culture;
var js = host.Services.GetRequiredService<IJSRuntime>();
var result = await js.InvokeAsync<string>("blazorCulture.get");
if (result != null)
{
    culture = new CultureInfo(result);
}
else
{
    culture = new CultureInfo("zh-TW");
    await js.InvokeVoidAsync("blazorCulture.set", "zh-TW");
}
CultureInfo.DefaultThreadCurrentCulture = culture;
CultureInfo.DefaultThreadCurrentUICulture = culture;

//await builder.Build().RunAsync();
await host.RunAsync();
Then you need to add this item to the project file. Click Your Project.Client
<PropertyGroup>
  <BlazorWebAssemblyLoadAllGlobalizationData>true</BlazorWebAssemblyLoadAllGlobalizationData>
</PropertyGroup>
It will actually look like this
<PropertyGroup>
	<TargetFramework>net6.0</TargetFramework>
	<BlazorWebAssemblyLoadAllGlobalizationData>true</BlazorWebAssemblyLoadAllGlobalizationData>
	<Nullable>enable</Nullable>
	<ImplicitUsings>enable</ImplicitUsings>
</PropertyGroup>
The JS to obtain the local storage parameter is (added to wwwroot/index.html):
JS<script>
    window.blazorCulture = {
        get: () => window.localStorage['BlazorCulture'],
        set: (value) => window.localStorage['BlazorCulture'] = value
    };
</script>
Step 2-Create corresponding translation information
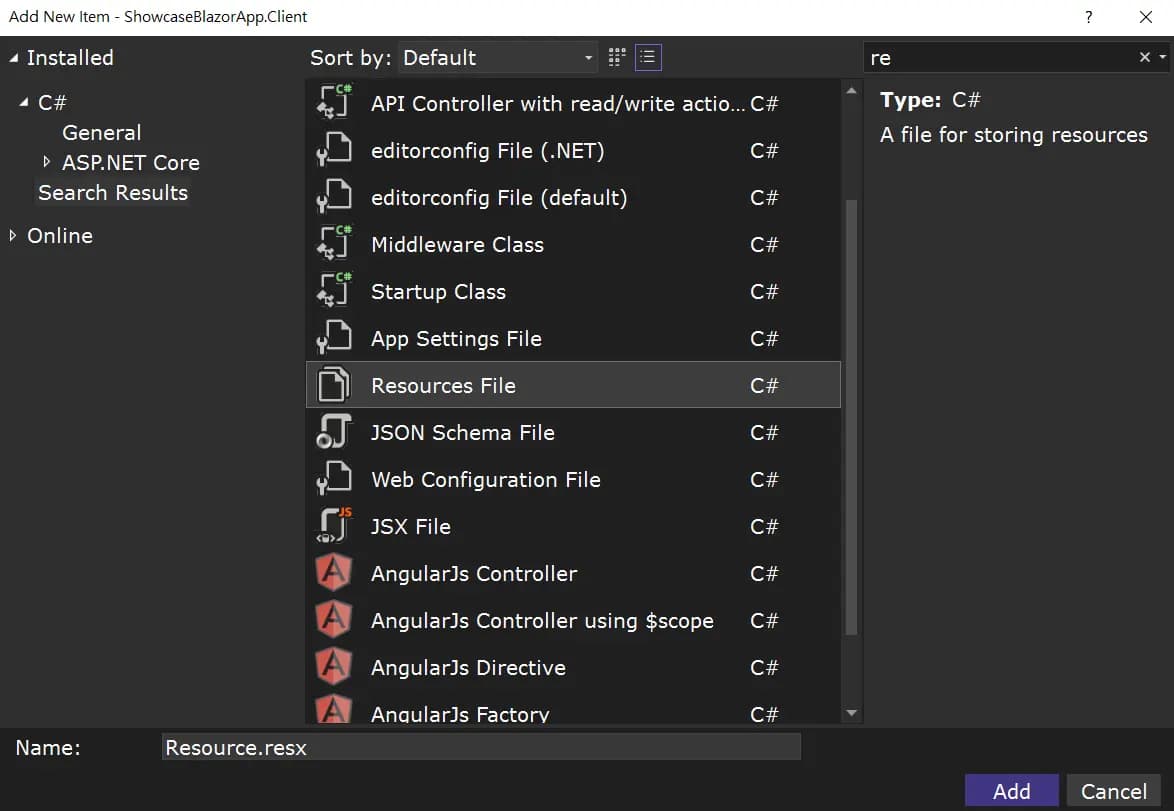
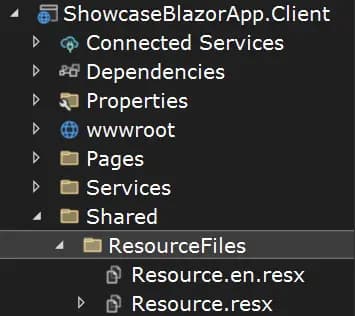
🔗Create resource files in your project.Client/Shared/ResourceFiles

With resource files in other languages, an additional English language structure is created here as follows:

Then you can establish the text data corresponding to the actual language of the key.
Step 3-Globalization
🔗Next, just use the resource file and injection service in the razor file corresponding to the desired screen to achieve the effect of changing the language.
C#@inject Microsoft.Extensions.Localization.IStringLocalizer<Resource> localizer
@using ShowcaseBlazorApp.Client.Shared.ResourceFiles
For strings that need to be converted into multiple languages,
C#@localizer["key"]
can be used to successfully obtain the value of the resource file and display it.
Here I found that if the corresponding resource file cannot be found, the key will be displayed directly, so I directly use the Chinese version of the translation as the key, so that I only need to add the value corresponding to the English language.

Step 4-Add language selection menu
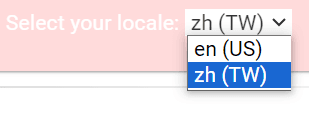
🔗The example on the official website is to add a simple drop-down menu object CultureSelector.razor
C#@using  System.Globalization
@inject IJSRuntime JS
@inject NavigationManager Navigation

<p>
    <label>
        Select your locale:
        <select @bind="Culture">
            @foreach (var culture in supportedCultures)
            {
                <option value="@culture">@culture.DisplayName</option>
            }
        </select>
    </label>
</p>

@code
{
    private CultureInfo[] supportedCultures = new[]
    {
        new CultureInfo("en-US"),
        new CultureInfo("zh-TW"),
    };

    private CultureInfo Culture
    {
        get => CultureInfo.CurrentCulture;
        set
        {
            if (CultureInfo.CurrentCulture != value)
            {
                var js = (IJSInProcessRuntime)JS;
                js.InvokeVoid("blazorCulture.set", value.Name);

                Navigation.NavigateTo(Navigation.Uri, forceLoad: true);
            }
        }
    }
}
Add a drop-down menu in MainLayout.razor to allow users to switch languages at any time.
C#<article class="bottom-row px-4">
    <CultureSelector />
</article>

The above is the implementation process for adding multiple languages to Blazor Webassembly. In fact, there is still some content such as automatically obtaining the user's language. I haven't search it yet, but using the menu to change the language is enough to personal needs, so that's all.
Reference
Alvin
Software engineer who dislikes pointless busyness, enjoys solving problems with logic, and strives to find balance between the blind pursuit of achievements and a relaxed lifestyle.


