ASP.NET Core Web API & Blazor 實作Amazon S3 檔案串接

前言
🔗此篇的專案架構為使用 Blazor WebAssembly Hybrid的方式,結合 Blazor WebAssembly 前端與後端Server API,所以除了紀錄使用Web API 串接S3 外,也順便紀錄 Blazor WebAssembly 呼叫API 傳遞檔案的流程。
環境
🔗- Blazor Webassembly Hybrid
- .Net 6
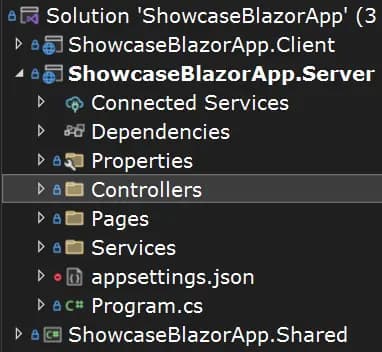
一般Web API專案比較單純,若是使用Blazor WebAssembly Hybrid 的方式,整個專案結構分為 Client、Server 與Shared,而Server 就可以把他當成一般的Web API專案,包含Controller 等結構。

前置流程
🔗- 安裝對應版本的 AWSSDK.S3 Nuget package
即可透過 AWS SDK 與 .NET 應用程式在 S3 上執行操作,
- 取得授權金鑰
這個方法是透過第三方(Web API)來存取 AWS S3,需藉由 AWS Identity and Access Management (IAM) 安全地控制對AWS 資源的存取。也就是取得授權金鑰以便之後透過API 操作。(如何取得金鑰詳情請查閱官網!)
- 設定金鑰至專案
C#的專案需要至appsettings.json設置,本專案設置結構如下:
json{
  "AWS": {
    "AccessKey": "Your AccessKey",
    "SecretKey": "Your SecretKey"
  }
}
建立S3操作方法
🔗- 基本設置
C#using Amazon.Runtime;
using Amazon.S3.Transfer;
using Amazon.S3;
using Amazon.S3.Model;
using System.Web;

private IConfiguration configuration;
private readonly AwsCredentials awsCredentialsValues;
private readonly BasicAWSCredentials credentials;
private readonly AmazonS3Config config;

public StorageService()
{
    // Initializing configuration using appsettings.json file
    configuration = new ConfigurationBuilder()
                        .AddJsonFile("appsettings.json")
                        .Build();

    // Retrieving AWS section from the configuration
    var awsConfig = configuration.GetSection("AWS");

    // Retrieving AccessKey and SecretKey from the AWS section
    string accessKey = awsConfig["AccessKey"];
    string secretKey = awsConfig["SecretKey"];

    // Creating AWS credentials object
    awsCredentialsValues = new AwsCredentials()
    {
        AccessKey = accessKey,
        SecretKey = secretKey
    };

    // Creating BasicAWSCredentials object using AccessKey and SecretKey
    credentials = new BasicAWSCredentials(awsCredentialsValues.AccessKey, awsCredentialsValues.SecretKey);

    // Configuring Amazon S3 region endpoint to APNortheast1
    config = new AmazonS3Config()
    {
        RegionEndpoint = Amazon.RegionEndpoint.APNortheast1
    };
}
RegionEndpoint需根據S3選擇的服務地區修改。
- 建立資料夾
C#public async Task<bool> CreateFolder(string folderPath)
{
    folderPath = HttpUtility.UrlDecode(folderPath);
    var s3client = new AmazonS3Client(credentials, config);

    PutObjectRequest request = new PutObjectRequest()
    {
        BucketName = "Your BucketName",
        Key = folderPath // in S3 key represents a path
    };

    PutObjectResponse response = await s3client.PutObjectAsync(request);

    if (response.HttpStatusCode == System.Net.HttpStatusCode.NoContent)
    {
        return true;
    }

    return false;
}
上傳的物件結構(可根據需求設置)
C# public class S3Obj
    {
        public string Name { get; set; } = null!;
        public MemoryStream InputStream { get; set; } = null!;
        public string BucketName { get; set; } = null!;
    }
- 上傳檔案
C#public async Task<S3ResponseDto> UploadFileAsync(S3Obj obj)
{
    var response = new S3ResponseDto();
    try
    {
        var uploadRequest = new TransferUtilityUploadRequest()
        {
            InputStream = obj.InputStream,
            Key = obj.Name,
            BucketName = obj.BucketName,
            CannedACL = S3CannedACL.NoACL
        };

        // Initialize client
        using var client = new AmazonS3Client(credentials, config);

        // Initialize the transfer/upload tools
        var transferUtility = new TransferUtility(client);

        // Initiate the file upload
        await transferUtility.UploadAsync(uploadRequest);

        response.StatusCode = 201;
        response.Message = $"{obj.Name}";
    }
    catch (AmazonS3Exception s3Ex)
    {
        response.StatusCode = (int)s3Ex.StatusCode;
        response.Message = s3Ex.Message;
    }
    catch (Exception ex)
    {
        response.StatusCode = 500;
        response.Message = ex.Message;
    }
    return response;
}
回傳的檔案物件(可根據需求設置)
C#public class S3FileInfo
    {
        public string Url { get; set; } = string.Empty;
        public byte[]? File { get; set; } = null;
        public string Name { get; set; } = string.Empty;
        public string str_Id { get; set; } = string.Empty;
        public int Order { get; set; } = 0;
    }
因專案需求為使用檔案url在前端顯示。若要預防洩漏永久可使用網址(避免檔案供人任意下載傳遞),取得檔案時藉由GetPreSignedURL取得預簽署 URL(Pre-signed URL)。
Pre-signed URL 是 Amazon S3(Simple Storage Service)提供的一種機制,允許以安全且有限的方式授予對存儲桶中特定資源的訪問權限。這是一個時間受限的 URL,授予了對於特定 S3 資源(如對象或文件)的暫時訪問權限。
- 取得檔案
C#public async Task<List<S3FileInfo>> GetFileAsync(ListObjectsV2Request request)
{
    // Initialize Amazon S3 client
    var s3client = new AmazonS3Client(credentials, config);

    // Get objects list based on the provided request
    var response = await s3client.ListObjectsV2Async(request);
    List<S3FileInfo> result = new List<S3FileInfo>();

    foreach (var obj in response.S3Objects)
    {
        // Skip if the object is a folder (ends with "/")
        if (obj.Key.EndsWith("/")) continue;

        // Generate a pre-signed URL for the object
        var presignRequest = new GetPreSignedUrlRequest()
        {
            BucketName = "Your BucketName",
            Key = obj.Key,
            Expires = DateTime.UtcNow.AddSeconds(86400),
        };
        var presignedUrlResponse = s3client.GetPreSignedURL(presignRequest);

        // The following content depends
        //on the file's naming convention
        //logic and the format of the returned file
        // Modify this logic according to your file
        //naming conventions and desired file format

        // Extract file information
        string name = Path.GetFileName(obj.Key);
        string[] info = name.Split('.');
        string str_ID = string.Empty;
        if (info.Length > 0) str_ID = info[0];

        // Add S3 file info to the result list
        result.Add(new S3FileInfo
        {
            Url = presignedUrlResponse,
            Name = obj.Key,
            str_Id = str_ID
        });
    }
    return result;
}
- 刪除檔案
C#public async Task<bool> DeleteFileAsync(string key)
{
    key = HttpUtility.UrlDecode(key);
    var s3client = new AmazonS3Client(credentials, config);
    var response = await s3client.DeleteObjectAsync("YourBucketName", key);
    if (response.HttpStatusCode == System.Net.HttpStatusCode.NoContent)
    {
        return true;
    }
    return false;
}
key就是實際檔案的路徑,若要刪除的為資料夾,key為 ForderName/,若資料夾底下有檔案此方法就無法刪除資料夾,需先清空所有資料,才能刪除資料夾。
以上的流程,主要根據目前專案需求實作幾個方法,包含建立資料夾、上傳檔案、以預簽署的方式取得檔案URL、與刪除檔案。
接下來則是紀錄API的代碼與前端的部分如何呼叫API。
Blazor Server端(Web API)
🔗- 取得檔案
C#[HttpGet("product/{file}")]
public async Task<List<S3FileInfo>> GetProductFile(string file)
{
    var request = new ListObjectsV2Request()
    {
        BucketName = "YourBucketName",
        Prefix = $"YourFolderName/{file}"
    };

    List<S3FileInfo> FileInfo = await _storageService.GetFileAsync(request);
    return FileInfo;
}
- 上傳檔案
C#[HttpPost("product/{FileId}")]
public async Task<S3ResponseDto> UploadProductFile(IFormFile file, string FileId)
{
    //Prevent unauthorized users from uploading
    var authorizationHeader = HttpContext.Request.Headers["Authorization"];
    bool IsAuthentication = _authService.CheckToken(authorizationHeader);
    var result = new S3ResponseDto();

    if (IsAuthentication)
    {
        // Process file
        await using var memoryStream = new MemoryStream();
        await file.CopyToAsync(memoryStream);

        var fileExt = Path.GetExtension(file.FileName);
        var docName = $"{FileId}{fileExt}";

        // Call server
        var s3Obj = new S3Obj()
        {
            BucketName = "YourBucketName",
            InputStream = memoryStream,
            Name = "YourFolderName/" + docName
        };

        result = await _storageService.UploadFileAsync(s3Obj);
    }
    return result;
}
- 刪除檔案
C#[HttpDelete("{key}")]
public async Task<bool> Delete(string key)
{
    //Prevent unauthorized users from deleting
    var authorizationHeader = HttpContext.Request.Headers["Authorization"];
    bool IsAuthentication = _authService.CheckToken(authorizationHeader);

    if (IsAuthentication)
    {
        return await _storageService.DeleteFileAsync(key);
    }
    else
    {
        return false;
    }
}
Blazor Client端
🔗註冊一個StorageService的服務,對應API的取得、上傳與刪除檔案等功能。
實際代碼為:
C#public class StorageService : IStorageService
{
    private readonly HttpClient _http;

    public StorageService(HttpClient http)
    {
        _http = http;
    }

    public async Task<List<S3FileInfo>> GetProductFile(string file)
    {
        var result = await _http.GetFromJsonAsync<List<S3FileInfo>>($"api/Storage/product/{file}");
        return result;
    }

    public async Task<string> UploadFile(string FileId, string fileName, MemoryStream InputStream)
    {
        var response = await _http.PostAsync($"api/Storage/product/{FileId}",
            new MultipartFormDataContent {
                {
                    new StreamContent(InputStream), "file", fileName
                }
            });

        var newFileKey = (await response.Content.ReadFromJsonAsync<ServiceResponse<S3ResponseDto>>()).Message;
        return newFileKey;
    }

    public async Task DeleteProductImage(string key)
    {
        key = $"YourFolderName/{key}";
        string encodedKey = Uri.EscapeDataString(key);
        var result = await _http.DeleteAsync($"api/Storage/{encodedKey}");
    }
}
結語
🔗本篇主要為記錄如何透過AWS SDK 與.NET 操作 S3,實際API 的設置與Client 端串接其實可以更優化,避免Bucket 結構洩漏的風險,也因代碼已經是原本專案簡化後的結果,如有問題或錯誤歡迎提出。
參考資料
- Working with AWS S3 using ASP.NET Core – Upload, Download & Delete Files – Simplified
- Configuring AWS Credentials for .NET Applications – Detailed Guide
- Amazon S3 For the .NET Developer: How to Easily Get Started
Alvin
軟體工程師,討厭瞎忙,喜歡用邏輯解決問題,努力在盲目追求成就感與放鬆的生活中取得平衡。


